
Here’s a blog post that’s a departure from the content I usually post here. If I was a normal person, I would make a video essay about how I make the 8-bit covers of music that I regularly post to my YouTube channel, but I don’t enjoy video editing at all, so I’m going to discuss all this in a blog post instead.
I’ve lately come to realize that my style of chiptune covers is very different from what most people doing chiptune on YouTube go for: instead of making a reinterpretation of a song based on simple chiptune instruments, my covers are made on a basis of translating songs to Famitracker as faithfully as I can. Though I used to be a big fan of chiptune covers of all kinds, I now strongly gravitate towards such translation-based covers because it’s incredibly impressive when the overall feel of a song, whether it be hectic, dramatic, funky, or relaxing, is recreated within the limitations of an NES console (or more often, expansions thereof). It’s also because I enjoy transcribing other music much more than making my own music, so in a way these covers are really just transcriptions under constraints. A lot of people really enjoy this style of covers I do, and I myself think I have improved by enormous amounts since I started doing chiptune covers in 2016. So I thought it would be fun to make a blog post list my personal tips and tricks for translating music into chiptune form.
Section 1: The Basics
Here is a screenshot of what my 8-bit cover project files typically look like:
Famitracker, the most commonly used software for emulating the NES soundchip, looks scary to a lot of people—it most certainly looked scary to me before I learned how to use it. I won’t teach you how to use trackers in this post, because there are plenty of videos online that can teach you that, so basic knowledge of the workings of Famitracker is recommended for reading this post.
Anyway, from this screenshot, there are a few basics I can talk about. The first things I want to discuss are speed and tempo. Tempo is beats per minute, while speed indicates which division of a beat a single line takes up (lower number = faster speed). My preferred speed for making chiptune covers used to be 6 (one line is one sixteenth note, or 1/4 of a beat), but these days I more often use speed 3 (one line is one thirty-second note, or 1/8 of a beat), which I find to be a good compromise between allowing detailed nuances in my covers and keeping the project files somewhat readable. I also sometimes use speed 4 for songs in a swing or triplet rhythm (one line is 1/6 of a beat).
Something else I want to bring up is that the vast majority of my covers (including the one screenshotted above) are made with the VRC6 soundchip, which allows for eight channels:
- two pulse channels with three (technically four) options for width: 12.5%, 25%, 50%
- triangle
- noise
- DPCM (I almost never use this one)
- two more pulse channels with eight options for width, which are multiples of 6.25% ranging from 6.25% up to 50%
- sawtooth
Most NES games use the plain old 2A03 soundchip, which allows for only the two pulses, triangle, noise, and DPCM. VRC6 was used in the Japanese release of Castlevania III: Dracula’s Curse and a few other games, and while not very common in old video games, the soundchip has caught extensive use by chiptune artists and is frequently used for original chiptune pieces, with Shovel Knight‘s absolutely mind-blowing soundtrack as a notable example.
Different people have different preferences for what to do with which channel, like where to put percussion, bass, and lead parts. I put all percussion in noise except for occasional triangle kicks, and I use triangle almost exclusively for bass (though I often put backing bass parts in other channels, more on that later). Many people use both DPCM samples and noise for percussion, but I find it too much of an annoyance that those samples make the triangle and noise channels quieter, so I typically do without DPCM. While I have seen plenty of phenomenal chiptune work that uses the VRC6 soundchip differently from how I do, I think my setup suits itself very well for translation-style 8-bit covers.
Section 2: How to Translate Instruments to Chiptune
A lot of amateurish-sounding chiptune work I’ve seen (including my old stuff) doesn’t bother with translating specific instruments to 8-bit, instead just using very simple waves for everything. If you just put notes in Famitracker with basic settings and just two or three different instruments without any special effects, chances are your cover will sound very flat. I have specific ways of translating different types of instruments to chiptune, which I’ve devised largely through trial and error. I’ll give a few examples of instrument settings I like to use.
Drums
In my chiptune project files, the first few instruments are usually named things like “short drums”, “med drums”, or “long drums”, and are variants of this:
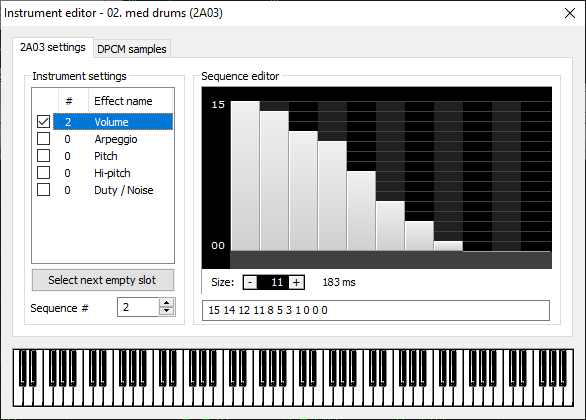
This is the volume setting I typically use for snares (pitch 7-9), toms (pitch 1-6), and kicks (pitch 0-1); a longer version of this is what I use for cymbals (pitch A-D), while a shorter version is what I use for hats (pitch D-F). Since my chiptune covers usually put all the percussion instruments in the noise channel, only one drum can play at any given time, so I put them in a priority list of sorts: cymbals > toms > kicks > snares > hats. This basically means that I usually first transcribe the rhythm of the hats, then the snares overwriting hats as needed, then the kicks over that, and so on through the priority list. I actually never thought of it as a “priority list” until I wrote this post, it’s really just a natural habit for me.
It tends to sound a little weird having all the percussion in the noise channel, because real life drummers are obviously capable of hitting more than one drum at the same time. To compensate for this, I often put a bit of a kick sound into the triangle channel’s bass notes as well, which brings me to the next example.
Bass

I sometimes make the bass notes just a plain old triangle wave, but more often than not, I put an arpeggio effect to make the bass double as a kick sound. With this arpeggio effect, a bass note starts with notes respectively 12, 8, and 4 semitones higher than the note listed, but played so quickly it sounds like a kick. Once I realized this was something I could do in the triangle channel, it was so hard to go back to plain triangle bass, unless I specifically thought it sounded good. Sometimes I even use multiple bass instruments, like one with 12 8 4 0 arpeggio, and another with 16 12 8 4 0 arpeggio to sound stronger.
If I don’t think the bass sounds full enough in the triangle, I often use the VRC6 saw channel, or sometimes one of the pulse channels, to play the same notes (sometimes an octave higher or lower) as the bass with an instrument that looks like this:
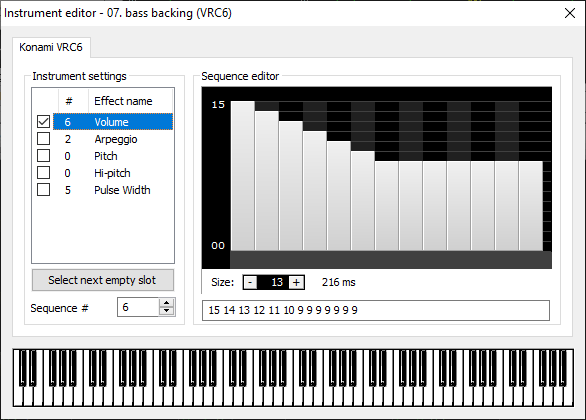
Sometimes I put an arpeggio effect on the backing bass instrument, like I do with triangle bass. I’ll talk more about having multiple channels play the same notes a bit later. Anyway, next example.
Piano
These two images represent a piano instrument setting I have copied and pasted across numerous chiptune project files, because it works really well and allows for a lot of freedom. In the volume sequence, the bars labeled as “release” mean that there are two ways you can end notes: ending it abruptly by typing “1” into the tracker, or ending it smoothly with the release volume by typing “\”, which for some stupid reason gets to be on the keyboard while the em dash doesn’t, into the tracker. I know that real pianos have the note gradually fade if you hold it long enough, but I find it easier to replicate the sound of a piano this way. I usually set the pulse width 6 when I put this piano into VRC6 channels, allowing it to sound almost the same whether it’s a pulse or a saw. When putting this piano into 2A03 channels, I usually set the duty/noise (equivalent of pulse width) to 1, which is a 25% pulse.
Guitar
There are many different sounds a guitar can make, but for the sake of this section, I’ll discuss how I translate what comes to most people’s minds when they hear “guitar solo” to 8-bit. The guitar solo instrument sample I use varies from cover to cover, but it’s usually something like this:
Guitars are one of many instruments where I don’t make the pulse width just one number. Like the arpeggios I put on bass instruments, variable pulse widths can make your chiptune covers sound much more lively. Pulse width sequences are an invaluable tool for giving variety to instruments in your covers. For example, you can have one 2A03 instrument be a descending volume sequence with duty/noise 2 (50% pulse), and another be the same with duty/noise 1 2 (25% then 50%), and the two instruments will sound very different, with the second considerably stronger sounding than the first. I could give plenty more examples of variable pulse widths, but instead I’ll give an example of the opposite:
Synths
You know what’s cool about giving complex volume, arpeggio, or pulse width patterns to Famitracker instruments? If you do that with most of your instruments, then you can use instruments that don’t do anything complicated to represent synths that already sound like chiptune in the song you’re transcribing. The instrument shown above, for example, is a plain old 50% pulse wave, and I often use it to translate synth leads that sound like a plain old 50% pulse wave. It’s just like translating a foreign text with occasional English words into English: the English words are already in English, so why change them?
Section 3: How to Fill All Channels
A challenge many people new to Famitracker run into is how to squeeze notes in a complex part of a song into just eight channels, or however many the soundchip they’re currently using has. I’ve conquered that beast long ago with tricks like arpeggio effects and sacrificing background parts, which has led me to the opposite challenge: how can you fill up all eight (or in my case, seven because I ignore DPCM) channels whenever possible to get that full, rich sound? I have a lot of tips and tricks for filling channels, and I use them so habitually that it’s weird to look back at my covers where some channels were not used for long stretches at all.
One fill-up trick I use very often that’s good for lead instruments is to have another quieter instrument play the same lead melody in a neighboring channel, either in a different octave, with a different instrument, with special effects to prevent it from clashing, or some combination of those. Often I’ll just have the main melody copied and pasted into another channel at very quiet volume and with the P81 effect (consult the Famitracker Wiki if you aren’t sure what those effects mean), which makes the duplicate notes a tiny fraction of a semitone higher and gives a really cool multilayered sound. Here’s an example with the 2019 version of my 8-bit cover of Umbral Ultimatum, a song from Homestuck:
This screenshot is a translation of a section of the original Umbral Ultimatum that consists only of chiptune instruments with no drums. Though there are only three lines of notes playing in that part (melody, countermelody, and bassline), I’ve doubled two of those lines of notes with the P81 effect and lower volumes, which makes it sound way better than the old version of that cover I made in 2016.
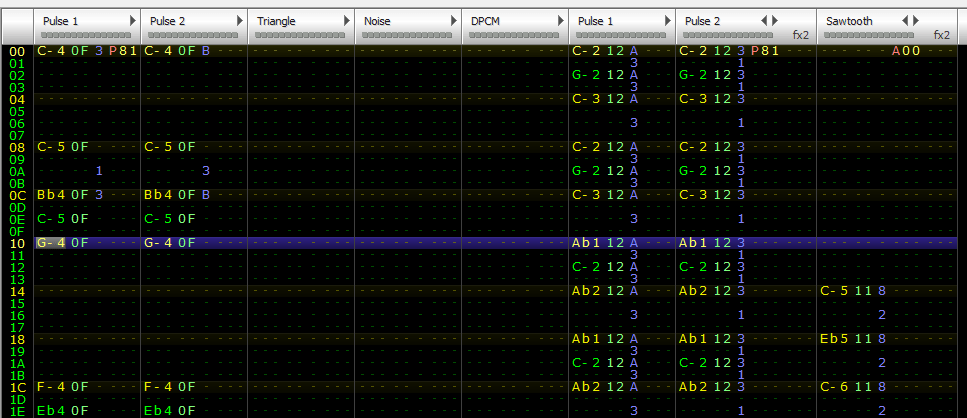
Here’s a screenshot of a different way I double melody lines, from my 8-bit cover of Deep Sea Zone Act 1 from Sonic Robo Blast 2:
In this example, the main melody is played in the VRC6 Pulse 1 channel on the right, while the VRC6 Pulse 2 channel is playing the same melody an octave higher with a slightly different instrument. Octave layering tricks aren’t exclusive to chiptune—they’re a valuable way to give depth to basically any form of music.
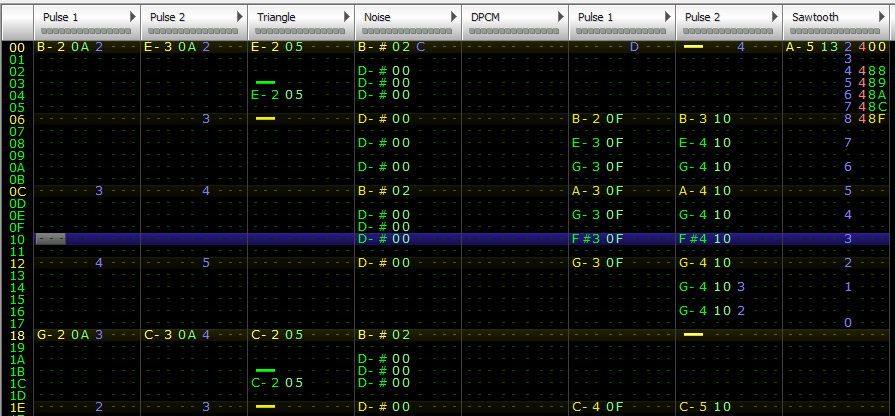
Doubling melodies isn’t the only way to fill up channels. You can also have a bit of fun and write your own harmonies to match with the chords, which I have done quite a few times in my covers. An example of original harmonies is in this screenshot later in my cover of Deep Sea Zone Act 1:

The leftmost Pulse 1 channel wasn’t my transcription of the original song—it was a part I added in myself because I was having trouble figuring out how to make it sound good as a chiptune. Adding original parts like this is a great thing to do when remixing songs in general, to help distinguish your remix from the original.
Section 4: Useful Effects
In Famitracker, effects are noted by sets of three characters to the right of the volume: the first character denotes which effect it is, and the other two are hexadecimal digits used as parameters. I already talked about how I use the Pxx effect, and here I will talk more about several other effects and how I use them.
0xy – Arpeggio
Arpeggios are an easy trick to squeezing multiple notes into one channel, by having the channel’s note rapidly alternate between the note listed and two offset notes determined by the second and third digits of the effect; for example, the effect 047 creates an arpeggiated major chord. Sometimes, arpeggiated notes in Famitracker aren’t very easy on the ears, especially for long notes. This means that in many cases, I stray from using arpeggio effects the regular way and instead use custom instruments for arpeggios. Here is an example of a custom arpeggio sequence that plays a major chord in a way much better suited for long notes:

An arpeggio sequence “| 0 4 7” would be identical to a 047 arpeggio effect, and sounds kind of like an annoying buzz if dragged on long. With the sequence “| 0 0 4 4 7 7” instead, the chord sounds much more natural and has this cool wavy feel to it.
3xx – Portamento
The portamento effect makes notes after where it is placed smoothly slide into each other with pitch bends, which is great for translating slurred notes into chiptune. The second and third digits together represent how quickly the notes transition, and when putting this effect on a melody, I make sure to use a higher number (like 320 instead of 310, for instance) when the melody does higher leaps between notes. I pretty much do it by trial and error until the portamento sounds right to me. See also Qxy/Rxy a bit later for a different way of pitch bends; there’s also 1xx/2xx but I don’t use those very often.
4xy – Vibrato
I’ve regularly used this effect in my chiptune covers ever since I started doing them. The second digit of the vibrato effect determines the vibrato’s speed, while the third digit determines the vibrato’s intensity (which is much more sensitive for high notes than low notes). I find vibrato to be an invaluable tool to make longer notes sound more natural, and the way I usually do it is by having the vibrato gradually appear using spaced out effects like, let’s say, 451, 452, then 453, and then reset to 400 (no vibrato) at the next note. It’s basically a natural habit for me to give vibrato to long notes, because they sound so much better with those effects. I sometimes use vibrato in other contexts like entire strings of notes, but I most often use it to add flair to long notes.
Qxy and Rxy – Pitch bends
If a note starts as one note but quickly transitions to another, these effects are my absolute go to. In those effects, the first character (Q or R) indicates whether to bend the note up or down, the third digit denotes how many semitones to pitch bend the note, and the second digit indicates the speed of the pitch bend. Songs have pitch bends like this a lot more often than you might think, which makes these two effects very handy for faithfully translating a song to chiptune.
Sxx – Mute delay
When doing chiptunes, you don’t have to end a note with a horizontal line (denoted by pressing 1 on the keyboard). You can also use this effect to allow more freedom as to where notes end. S01 ends a note one frame (1/24 of a beat in 150 BPM) after where the effect is placed, S02 ends it two frames after, and so on. It’s pretty much a matter of trial and error to determine what number to place after S to get the note to sound right.
These are just some of the effects I most commonly use in chiptune covers. There are many more effects worth trying out that you might find useful, and many other cool things you can do to make chiptune covers sound good, and this post was just scratching the surface of all the possibilities. All my YouTube uploads of my covers have downloads of the Famitracker project files in their descriptions, and I recommend checking those files out if you want to know more about how I do chiptune. A big part of how I learned Famitracker was looking at other people’s project files, which are often linked in the descriptions of YouTube uploads.
I hope you got something useful out of this post, but if you think I’m a dumb nerd for writing all this, that’s also fine. Either way, now that I’m done writing this post about chiptune covers, I think I will go back to making more chiptune covers. I’m still hard at work in my SRB2 8-bit cover project, but I also want to do covers of other music in between.

Have you received copyright claims or strikes on your covers?
LikeLike
I have had copyright claims on my covers a few times, which I take as a badge of honor because it means I transcribed the song accurately. Haven’t ever gotten a copyright strike on my covers, and hopefully it’ll stay that way.
LikeLike